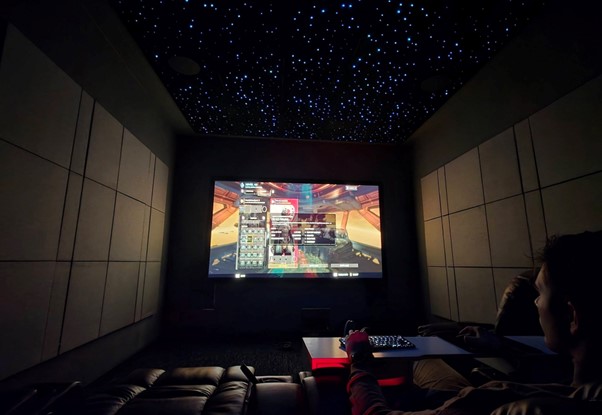
Most people assume the setup they have for movies will also work for gaming. It works at first, but the moment the game starts you will begin to notice that something just feels slightly off. That’s because most home theater design setups are not tuned for real-time response. If you need visuals and depth, they can work. However, the moment speed, precision, and constant feedback are needed, they will always fall short.
So how do you fix these issues without tearing everything apart in your present setup? In this article, we’ll walk through 10 practical ways to optimize what you already have for gaming.
Why Gaming Changes Home Theater Design
Gaming doesn’t just use your setup differently; it exposes every weakness in it. A typical home theater design is tailored for movies, where timing is controlled, audio is synced. While gaming is the opposite of everything movie setup stands for. From your controller to the display, through the AV receiver, and audio, each step adds a small delay, that throws off the timing.
That’s why gaming depends on low latency, fast refresh rates, and audio that lines up exactly with what’s happening on screen. And this is where most setups break down. What feels smooth for movies can still feel just a step behind when you’re playing Fortnite.
1. Fix Input Lag Before Anything Else
You can have great image and sound, and the experience still feels off. The culprit is usually input lag. It is that small delay between what you do and when it shows up on screen. That delay come from either your display enhancing the image or the receiver processing the signal before sending it through. Each step adds a little time, and together, it’s enough to throw off your timing.
When watching movies, that delay is not a big deal, but when gaming, you want that delay as low as possible. Under 15 milliseconds is a solid target, because at that level, the response feels immediate. The way to get there is by cutting extra processing, by using settings like Game Mode. They remove visual enhancements so your setup responds faster instead of trying to look better.
2. Sync Your Audio with Your Gameplay
Sound does not just magically pop out of your speakers. It follows a process. It first moves to your AV receiver. The receiver is where the audio is decoded, split across channels, and processed before being sent out. Each of those steps has a price, and that price is time. Now imagine if you have a wireless speaker or soundbar, the signal also has to be transmitted, which adds more latency.
If you want to optimize your audio, start by adjusting your audio delay settings. Use lip-sync controls to match sound with what you see, not just relying on default timing. Also, if you’re using wireless speakers, try switching to a wired connection. That change usually tightens the response time.
Then turn your attention to speaker placement, because even great audio can sound distorted in the wrong direction. When mapping your setup using a home theater design tool, you always have to account for how your speaker is positioned for an optimal audio experience.
3. Choose a Display Built for Speed, Not Just Size (Refined)
Bigger screens make films more immersive, but a gaming setup’s primary focus is performance not size. A simple way to improve performance is by focusing on the refresh rate first. If your setup is still running at 60Hz, moving to 120Hz or higher makes motion clearer and keeps everything in sync while you play.
After you have sorted out the refresh rate, the next logical step is your display type. If gaming is a priority, OLED is the safer choice. Why? Because it reacts faster at the pixel level, which maintains clarity while gaming. If you have a brighter room, QLED can still work. However, ensure the model you are getting is built with performance in mind.
Another factor to consider is whether you should get a projector for my gaming setup? And the answer is yes, you can. However, you need to know that projectors take longer to process an image. So, if you must get one, you have to get a model that is made for gaming.
4. Get Your Viewing Distance Right for Faster Reactions
Most people assume sitting closer gives them an edge. It doesn’t. In most cases, it slows you down. When you’re too close to a large screen, your eyes can’t take everything in at once, so you end up scanning instead of reacting. And in fast games, that split second of catching up is where mistakes happen.
Instead, give yourself enough distance to see the whole screen without effort. Sitting about 1.5 to 2.5 times the width of your display keeps everything in view, including movement at the edges. That way, you’re not chasing the action. You’re seeing it unfold in real time and reacting as it happens.
This is where peripheral vision starts to work in your favor. You don’t have to look at everything directly to notice movement, especially at the edges of the screen.
5. Use Game Mode and Custom Calibration
Game Mode deserves its own section due to how important it is if you want a truly responsive setup. It is usually the first thing people turn on when they want to reduce input lag. But what most people don’t know is how it changes the appearance of the image.
Once that processing is gone, the picture becomes more direct, but it can also make darker areas harder to read or wash out details you rely on during gameplay. That’s where you have to step, and tweak the brightness and shadow details to your taste.
6. Eliminate Screen Tearing with Adaptive Sync
If your screen ever looks like it’s struggling to keep up during fast movement, like the image is slightly split or not lining up cleanly when you turn or pan the camera, that’s screen tearing. It usually shows up when your system and display aren’t running at the same pace, so frames arrive out of order and start to overlap.
The fix is simple, but it’s often overlooked. Go into your display settings and turn on adaptive sync, usually called FreeSync or G-Sync. Once it’s enabled, your display stops running at its own pace and starts matching what your system is actually sending. That means frames arrive in order instead of clashing with each other, so you don’t get that split or broken look when things move quickly.
However, before you rely on it, make sure everything in your chain supports it. Your display, console or PC, and even your cable all need to match. If one piece is off, the feature won’t work the way it should.
7. Improve Sound Accuracy with Better Room Acoustics
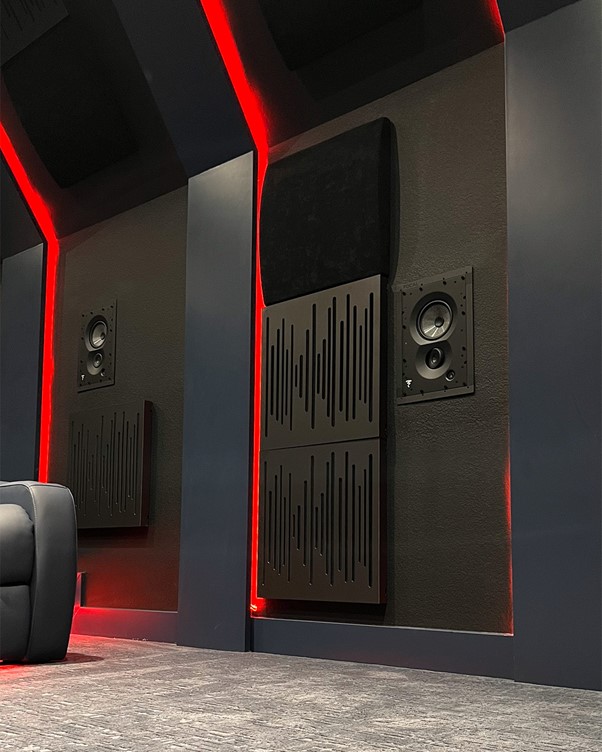
Sound doesn’t just travel straight line to you from your speaker and stop. It spreads out, hits your walls, floor, and ceiling, then reflects back a split second later. Now you’re hearing the same sound more than once, slightly out of sync.
So instead of changing your gear, start by controlling those reflections. Focus on the spots where sound hits first, usually the walls beside you and the wall behind your screen. Adding acoustic panels in those areas helps absorb that early bounce before it comes back into the room and interferes with what you’re hearing.
From there, small changes make a difference. Thicker curtains, a rug, or even softer furniture can help settle the extra reflections that build up over time.
8. Upgrade to HDMI 2.1 and High-Speed Connections
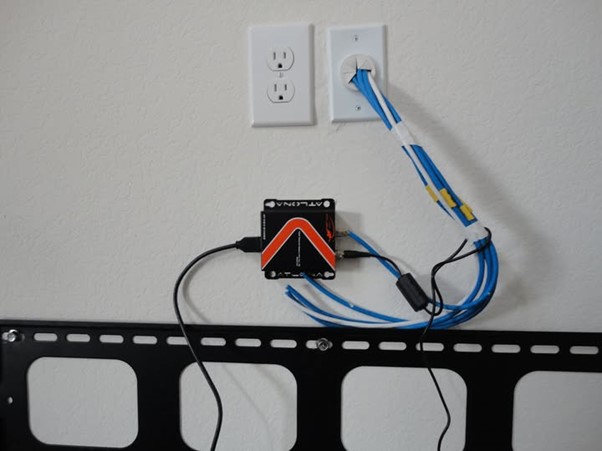
A lot of setups feel slower than they should, even when the display and console are more than capable. In many cases, the issue isn’t the gear itself, it’s the connection between them quietly holding everything back.
Start by checking your cable and ports. If you’re not using HDMI 2.1, your system can’t fully deliver features like 4K at 120Hz, variable refresh rate, or auto low latency mode. Instead, it scales things down in the background, so you end up with something that looks fine but doesn’t respond the way it should.
It’s also worth looking at your full signal path. If your setup runs through an AV unit, your speakers and receivers need to support HDMI 2.1 as well. If they don’t, they limit the signal before it even reaches your display.
9. Set Up Your Equipment for Cooling and Stability
Performance is not just about what you buy. It is about how consistently it can run, and heat is one of the main reasons that consistency starts to drop.
When your console or AV unit doesn’t get enough airflow, heat builds up over time. It won’t shut down. Instead, it quietly reduces performance to protect itself, which is why a setup can feel smooth at first and then slightly off during longer sessions.
To fix that, start by giving your equipment some breathing room. Avoid tight cabinets or stacking devices on top of each other, and leave space around the sides and back so air can move freely through the system.
At the same time, take a look at your cables. When everything is packed so tightly behind your gamming setup, it blocks airflow and traps heat in one place. So, the deliberate act of keeping your wiring clean and spreading them out helps maintain proper ventilation.
10. Control Lighting and Automation for Full Immersion
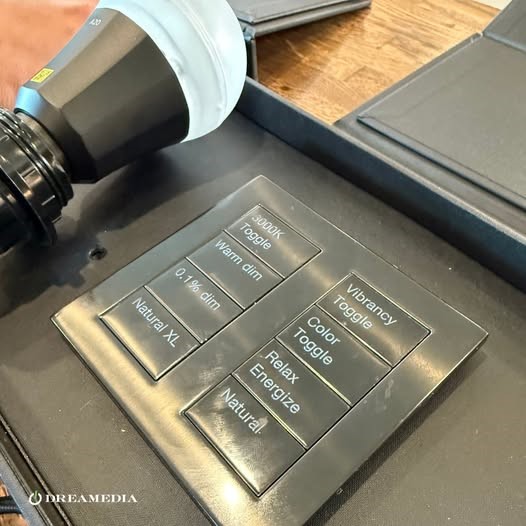
Most people see don’t lighting as part of their setup, but it quietly affects how well you see and how long you can stay comfortable.
Start by getting control over the light in the room. Too much of it hits your screen and creates glare. Too little and your eyes start working harder than they should. That’s where lighting and shades come in. Block direct light first, then add soft bias lighting behind your display so your eyes stay relaxed without dulling the image.
From there, make it easier on yourself. With smart home integration, you don’t need to adjust everything each time you sit down. So. why not setup a simple automation system that handles everything from lights, shades, and switching to game mode in one step.
CONCLUSION
A movie home theater setup and a gaming setup are two different beasts. They may look similar, but they rely on completely different priorities. One focuses on visuals and atmosphere. The other depends on speed, precision, and real-time response.
That’s why a system that feels perfect for movies can feel slightly off when you start playing. It’s not broken. It’s just not tuned for how games work.
The good news is you don’t need to start over. Small adjustments across your setup can bring everything back into sync.
If you want to take it further, consider getting a professional eye on your space. A quick scheduled consultation can help you fine-tune everything so your setup performs exactly the way it should.